In this tutorial, we’ll look on how to create a functional and simple ArchLinux virtual machine image, that can access the internet, display graphical windows and share a folder with the host to help you with your kernel development. The only requirement is that you need to have a working ArchLinux installation.
A virtual machine is useful in a lot of development scenarios, but it’s
particularly essential in the Linux kernel development. It can be really
time-consuming to install the kernel on your own system and then needing to
reboot the machine just to see if your printk() is working. This is why this
topic was already covered in
Collabora’s blog,
with Ezequiel explaining how to use
virtme
and Frédéric showing how to setup a minimal
Debian to use with QEMU-KVM.
As already said by my colleagues, there’s no need to install a complete system from scratch, using a installation disc. If you’ve already used to Arch Linux, you probably know that the distro slogan is “Keep it Simple, Stupid”. So let’s try not to suffer in order to get a kernel development environment. It may seem to be complicated to achieve this, but once I explain all the concepts behind it, you will notice how this is very customizable and easily scriptable, so you can automate this part of your workflow.
Since we’re going to work with two systems at the same time, let’s explicitly state in which machine you should run the command:
(host)$ # for you real machine

(guest)$ # for the virtual machine
Creating a disk
We will need a disk to store our new OS in. Hopefully, we have no need for a
physical device, a file will do the work. It’s up to you how much space you’ll
allocate, but I recommend a minimum of 4 GB. We’re going to create a 5GB sparse
file (a file that allocates space as needed) to be our disk, using the
truncate command:
(host)$ truncate -s 5G arch_disk.rawIf you check the size with du -h arch_disk.raw, it’s going to say 0
(because we haven’t used it yet), but if you run du -h --apparent-size arch_disk.raw you can see the maximum size the file may expand.
Let’s add a file system at this file. This means that this file will be ready to contain files and folders, and will contain the new file system as its data. This will make our disk to look and behave as a single partition.
(host)$ mkfs.ext4 arch_disk.rawSince we have a file that represents a partition, we can mount it. Create a directory to be the mounting point and mount it:
(host)$ mkdir mnt
(host)$ sudo mount arch_disk.raw mnt
Installing ArchLinux
Now that we have a disk, let’s place an initial system, just like when we are installing Arch. Install these packages:
(host)$ sudo pacman -S arch-install-scripts qemuThe first package has some scripts that are really helpful to install ArchLinux
(e.g. pacstrap, arch-chroot) and the second one is the QEMU emulator.
Just remember to check if you are using a nice mirror close to you on top of
your mirrorlist file (/etc/pacman.d/mirrorlist). This will speedup your
download.
Now, let’s transform that formatted partition into a functional system.
pacstrap is wrapper for pacman that will install in the first argument
(mnt) the packages/groups (base, base-devel) and create the root
filesystem, with the appropriated folders (lib, dev, tmp, home, …).
You may also take this step to add more packages that you would like to have
in the virtual environment, like vim for instance. If you want to enable
internet access in the guest in the future, use this step to install the
dhcpcd package. Just add then after base-devel in the following command:
(host)$ sudo pacstrap mnt base base-develPro tip: if your host system is up-to-date, you can use the flag
-cto just copy the packages from your host to the guest, instead of downloading them all again:pacstrap -c mnt ...
This will create the directory structure and install the basic packages. You can
navigate through mnt/ and see an entire file system there, and even change the
root to this new system:
(host)$ sudo arch-chroot mntIf you use ls and pwd you will see that you are definitely in a guest
system, and not in your host machine anymore. If you use uname -r you can see
the kernel version was installed on your host system:
(guest)$ ls
bin   dev  home  lib64	     mnt  proc	run   srv  tmp	var
boot etc  lib	 lost+found  opt  root	sbin  sys  usr
(guest)$ ls home/
(guest)$ pwd
/
(guest)$ uname -r 4.20.7-arch1-1-ARCH
Once inside, it can be useful to set a password for the root user with passwd.
Use CTRL+D to exit from the guest and then sudo umount mnt to umount the disk.
Let’s use a custom kernel now.
Using QEMU and your kernel
Now, for the next steps, you will need a compiled and functional Linux Kernel. You already have one, since you are running a GNU/Linux distribution, but if you still don’t have a custom kernel to make experiments, you can easily get one like this:
(host)$ git clone --depth=1 git://git.kernel.org/pub/scm/linux/kernel/git/torvalds/linux.git
(host)$ cd linux
(host)$ make x86_64_defconfig
(host)$ make kvm_guest.config
(host)$ make -j8
The goal of this article is not get in details on how to compile the kernel. For more information, check the Arch wiki article and have a look at ccache.
The git command will clone Linus’ tree source code of the kernel into your
machine. With the argument --depth=1, you won’t clone all the commit history of
the kernel and the download will be faster. If you want to have the
history (which is advisable with you want to send patches to the project),
remove this argument. The make ...config commands will create a basic kernel
with virtualization powers for x86_64 machines.
make -j8 can take some time and some CPU usage. The -j8 argument will create
8 jobs to compile the kernel, change it according to the number of threads in
your machine.
Let’s play with QEMU. We are going to use a lot of flags and arguments, so let’s check in details each one:
-hda disk.raw: specify that thearch_disk.rawfile should be provided as the first hard disk in the emulated system.-m 4G: amount of RAM we are going to loan to the virtual machine.-nographic: QEMU will run on the terminal instead of a graphical window.-kernel linux/arch/x86_64/boot/bzImage: define the file where your compressed kernel image is. You can also use the kernel installed on your machine, it should be somewhere in/boot/.-smp 1: how many virtual CPUs QEMU will use.-append "root=/dev/sda rw console=ttyS0 loglevel=5": kernel parameters.rootdefines which disk/partition has the root file system. In our case, it will be the first storage device1, the hard diskarch_disk.raw.rwthat we want to read and write to disk.consoleis to set the standard output of the kernel and of the PID 1.loglevelis to set how much log the kernel will output to the console and 7 is the highest and it will display all the kernel messages in the console prompt.- I don’t find the
Audit logs useful.
You can disable them with
audit=0. - You can learn more about kernel parameters in the documentation;
- I don’t find the
Audit logs useful.
You can disable them with
--enable-kvm: this is to enable hardware acceleration to virtualization.
Feel free to change these parameters to suit your environment. Now run it all together:
(host)$ qemu-system-x86_64 -hda arch_disk.raw -m 4G -nographic \
        -kernel linux/.../bzImage \
        -append "root=/dev/sda rw console=ttyS0 loglevel=5" \
        --enable-kvm
When the prompt displays archlinux login:, just type root and enter. Use uname -r again to check which kernel you are running. When you are done, use CTRL+a
then x to exit:
archlinux login: root
(guest)$ uname -r
5.0.0-rc1+
Auto login
If you always use the root user, you may set to auto login using systemd. Type
systemctl edit serial-getty@.service in the guest and a text editor will
open. Add those lines and in the next login you should be good:
[Service]
ExecStart=
ExecStart=-/usr/bin/agetty --autologin root --noclear %I $TERM
Connecting to the internet
You may want to install some packages on your virtual machine or perform some network tests, but as it stands, you can’t reach the internet:
(guest)$ ping eff.org
ping: eff.org: Temporary failure in name resolution
Let’s use our host as a network bridge; login in our virtual machine with root user and then:
(guest)$ systemctl enable dhcpcd
(guest)$ systemctl start dhcpcd
Every time your system boots, it’ll start to run a DHCP service and connects to the internet using a “virtual wire” to the host.
(guest)$ ping eff.org
PING eff.org (173.239.79.196) 56(84) bytes of data.
Due to the configuration of the NAT, you won’t get ping answers like
64 bytes from vm1.eff.org (173.239.79.196): icmp_seq=1 ttl=46 time=197 ms.
However, since we managed to solve the DNS (since ping showed to us the IP
address of eff.org), we are sure that we have internet connection.
Displaying graphical windows
If you want to run graphical applications inside your virtual machine, you may follow one of the methods:
-
QEMU display: use QEMU display in graphical mode with a GUI compositor;
-
SSH with XForwarding: use your own terminal to SSH into the VM and then display the content using your host’s display.
This can be useful to test some subsystems like DRM or V4L2. Keep in mind that
the performance won’t be the best and the functionality can be a bit buggy, so
I recommend using lightweight apps like gstreamer and ffmpeg.
QEMU display
The first difference here is that we’re going to remove the -nographic argument
from QEMU. Run it now and it should open a new window.
Now, make sure to have this module enabled at your kernel: DRM_BOCHS, a driver
to help us displaying graphical content in QEMU. This means that if you open the
.config file at your kernel source directory it should have this line:
CONFIG_DRM_BOCHS=y. Remember to recompile the kernel each time you change it’s
configuration.
We need software to manage the windows and display them on the screen, so we are going to install a lightweight Wayland compositor, weston:
(guest)$ pacman -S weston xorg-server-xwayland xorg-fonts-type1 xorg-xclockCreate a file ~/.config/weston.ini in guest and add this:
[core] xwayland=trueRun the weston command in guest, and the graphical interface should appear. You
can use your mouse to open the weston-terminal at the top left corner. If your
mouse is moving oddly, make sure your window zoom is set to the “Best fit”
option in the QEMU window bar. Inside the terminal, run xclock and you should
be able to check the hours inside your virtual machine. When you’re done, you
can use Ctrl+Alt+Backspace to quit weston.
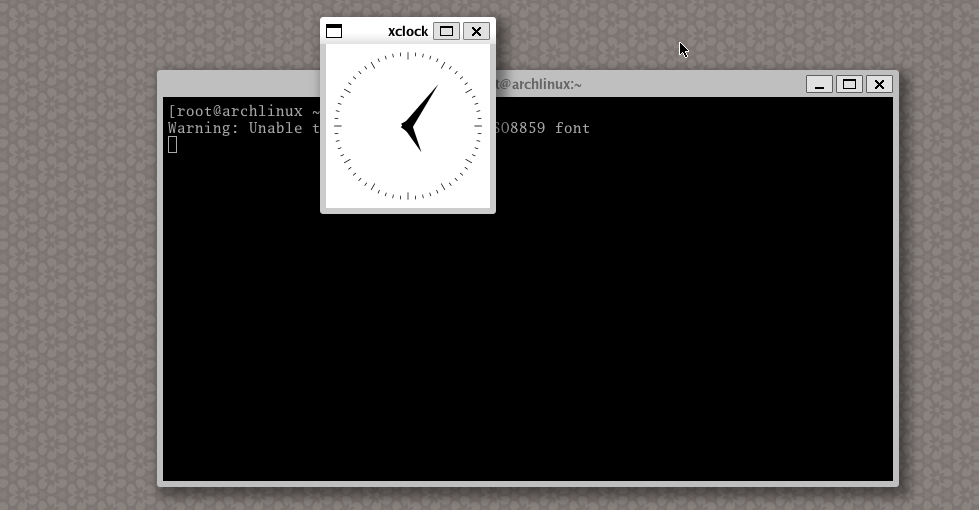 Screen capture showing
 xclock inside weston
This is just the basic setup using QEMU graphical mode. To improve performance
and usability (like to have clipboard and multimonitor support) one can use a
QEMU front end (like virt-manager) or SPICE to expand your options and features
between guest and host. Check the ArchWiki to learn more about
virtual graphic cards,
graphics acceleration and
SPICE.
XForwarding
This is a way to display graphical interfaces running in a remote host in the
local machine. This means that the X server on your guest machine will forward
the graphical input/output to the X client on your host machine. You can keep
the argument -nographic in QEMU. Let’s get some packages that will help us (you
need to install xorg-auth in both machines, the host and guest):
(host)$ sudo pacman -S xorg-xauth(guest)$ pacman -S xorg-xauth xorg-xclock openssh xorg-fonts-type1As in the last section, our goal here is to run the application xclock, a simple graphical clock as a proof of concept. If you try to run it now, this should happen:
(guest)$ xclock Error: Can't open display:That’s why we are going to use SSH, to help us get the graphical output. The
default TCP port of SSH is 22, but probably your localhost already has reserved
this port. Besides this, the IP address QEMU gives to your VM usually isn’t
routable. So, let’s map our guest 22 to another port, let’s say 1337, and
expose this port using the hostfwd option. This can be done with these
additional QEMU flags:
-net nic: creates a basic network card;-net user,hostfwd=tcp::1337-:22: maps port host’s1337to guest’s22.
If you try to access the machine now via ssh (with QEMU running with this new parameters), it won’t be possible yet:
(host)$ ssh root@localhost -p 1337 ssh_exchange_identification: read: Connection
reset by peer
In the guest, if you run systemctl status sshd, you can see that it isn’t
running. Let’s configure sshd before running it. Let’s edit guest’s
/etc/ssh/sshd_config to ensure that you have those lines uncommented and edited:
PermitRootLogin yes # allows root login with password via ssh
X11Forwarding yes # allows XForwarding
Let’s configure sshd to run at boot and to start now:
(guest)$ systemctl enable sshd
(guest)$ systemctl start sshd
(guest)$ systemctl status sshd
* sshd.service - OpenSSH Daemon
     Loaded: loaded (/usr/lib/systemd/system/sshd.service; enabled; vendor preset: disabled)
     Active: active (running)
     ...
To have access to the guest without using a password every time, you can
place your SSH public key inside the file ~/.ssh/authorized_keys. You can
copy and paste your key in this file while the guest machine is running, or
you can mount the guest rootfs and write in the file, like this:
(guest)$ # Stop guest machine using CTRL+A, X
(host)$ sudo mount arch_disk.raw mnt
(host)$ sudo su
(root-host)$ cat /home/user/.ssh/id_rsa.pub > mnt/root/.ssh/authorized_keys
(root-host)$ exit
(host)$ sudo umount mnt
Start the virtual machine again and, with a second terminal session, try to login:
(host)$ ssh root@localhost -p 1337
Last login: Mon Feb 18 17:57:15 2019 from 10.0.2.2
(guest)$
You can use exit command to close the session. If you don’t have a
.Xauthority file on your home folder, it will prompt a warning, but don’t
worry: after the warning, the file will be created. Access the virtual machine
using ssh with the argument -X:
(host)$ ssh -X root@localhost -p 1337And check the hours with xclock! To exit, you can also use CTRL+D.
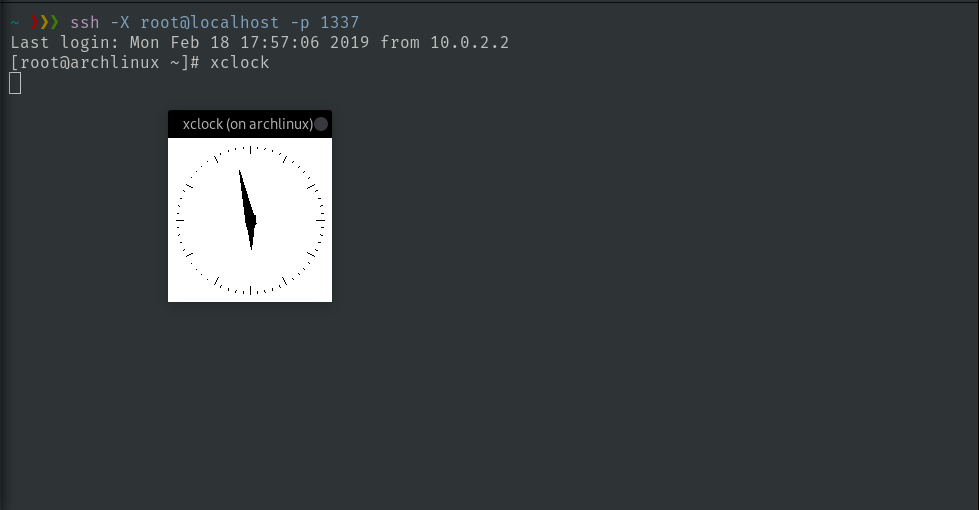 Screen capture showing xclock with XForwarding
Shared folder between host and guest
Copy-pasting is definitely not the best way to send a file to your guest machine. Hopefully, we can easily solve this problem by sharing a folder between machines.
If you ran make x86_64_defconfig and make kvmconfig before the kernel
compilation, you should already have the required modules enabled. If you get
errors, please make sure your kernel has the following options enabled:
(host)$ grep 'VIRTIO_PCI=\|NET_9P=\|9P_FS=\|NET_9P_V\|IG_PCI=' .config
CONFIG_NET_9P=y
CONFIG_NET_9P_VIRTIO=y
CONFIG_PCI=y
CONFIG_VIRTIO_PCI=y
CONFIG_9P_FS=y
If something looks like # CONFIG_XXX is not set, you should enable it.
Now, elect a folder to be your shared holder, for example /home/user/shared.
Then, we need to add more arguments to our QEMU command:
-fsdev local,id=fs1,path=/home/user/shared,security_model=none: this will add a new file system device to our emulation. Make sure to put the right directory at path. Don’t worry aboutsecurity_model=none, this argument will let the permission of creating/modifying files inside the guest as if was created by the host user.-device virtio-9p-pci,fsdev=fs1,mount_tag=shared_folder: this defines the name and type of the virtual device.
We need to edit our guest /etc/fstab. It should look like this:
# Static information about the filesystems.
# See fstab(5) for details.
# <file system> <dir> <type> <options> <dump> <pass>
shared_folder /root/host_folder 9p trans=virtio 0 0
This determines the mounting pointing of the shared folder. As long you are
consistent, you can choose whatever name for shared_folder and host_folder.
Reboot the guest machine and then:
(guest)$ ls /root/
host_folder
Adding a new user
For some testing or actions, it’s maybe useful to have a regular user, that is
not the root one. For instance, makepkg refuses to run as root for safety
reasons. The following commands should be used in the guest. Use useradd -m user -G wheel to create a new user with the name user, with a home directory
and part of group wheel. You can set a password for it using passwd user.
To use this account, just type su user. If you want to login to this user
from SSH, remember to add the public key to /home/user/.ssh/authorized_keys.
If you want to be able to run any sudo command without typing password, run
as root user visudo and uncomment the line that says %wheel ALL=(ALL) NOPASSWD: ALL.
Conclusion
You may also want your kernel to have a custom name, it may be useful for you to
organize your versions. You can do this changing the LOCALVERSION value at
menuconfig or simply running make LOCALVERSION=, e.g.:
(host)$ make LOCALVERSION=-VM ...
(host)$ qemu-system-x86_64 ...
(guest)$ uname -r
5.0.0-rc1-VM
Now you can easily hack and test your kernel! I recommend you read this section of the ArchWiki, as you’ll find some cool tips to improve your VM performance. You may also want to create scripts and alias to not deal with all the flags, that will definitively make your life easier.
This content was originally posted at Collabora’s blog , as part of my Software Engineer job. It was slight updated and edited before being posted here.
-
The observant will notice that the argument used by QEMU to specify the first drive is
hda, which results in the kernel enumerating a drive assda. Historically IDE drives were labelledhdX(whereXis an increasing drive letter), but for quite a while it has been typical for IDE drives to be accessed via an emulation layer in the SCSI subsystem, which labels drivesdX. Also in contrast to how most physical hard drives are used, we have not created a boot partition and partitions in the virtual drive, instead treating the whole device as a partition, and thus lacking the numerical suffix we would typically see when referring to specific partitions. ↩︎